Articles by "computer tips"
Showing posts with label computer tips. Show all posts


How do I get a rank fast on Fiverr in 2023?

Ranking your gigs on Fiverr can be a challenging task, but there are some steps you can take to increase your visibility and chances of getting more orders. Here are some tips to help you rank your gigs on Fiverr:

Optimize your gig title, tags, and description: Your gig title, tags, and description are critical factors in determining where your gig ranks in Fiverr search results. Ensure that your gig title is clear and concise, and use relevant keywords in your tags and description.

Offer a competitive price: Pricing is an important factor in Fiverr's ranking algorithm. Offering a competitive price for your services can help increase your chances of appearing higher in search results.

Promote your gig outside of Fiverr: Fiverr's algorithm takes into account external traffic sources, such as social media, when ranking gigs. Promoting your gig on social media or other platforms can drive more traffic to your gig, increasing your chances of getting orders and improving your Fiverr search ranking.

Respond to buyer requests: Responding to buyer requests can help you get more orders and improve your Fiverr search ranking. Fiverr's algorithm favors sellers who are responsive and engaged with their buyers.

Deliver high-quality work: Delivering high-quality work is essential for building a positive reputation on Fiverr. Positive reviews from satisfied customers can help improve your Fiverr search ranking and attract more orders.

Remember that ranking your gig on Fiverr takes time and effort. By following these tips and consistently delivering high-quality work, you can increase your visibility and improve your chances of getting more orders.


Miscrosoft Word Keyboard Shortcut Keys

Ctrl + A - Select All
Ctrl + B - Bold
Ctrl + C - Copy
Ctrl + D - Fill
Ctrl + F - Find
Ctrl + G - Find next instance of text
Ctrl + H - Replace
Ctrl + I - Italic
Ctrl + K - Insert a hyperlink
Ctrl + N - New workbook
Ctrl + O - Open
Ctrl + P - Print
Ctrl + R - Nothing right
Ctrl + S - Save
Ctrl + U - Underlined
Ctrl + V - Paste
Ctrl W - Close
Ctrl + X - Cut
Ctrl + Y - Repeat
Ctrl + Z - Cancel
F1 - Help
F2 - Edition
F3 - Paste the name
F4 - Repeat the last action
F4 - When entering a formula, switch between absolute / relative references
F5 - Goto
F6 - Next Pane
F7 - Spell Check
F8 - Extension of the mode
F9 - Recalculate all workbooks
F10 - Activate Menubar
F11 - New graph
F12 - Save As
Ctrl +: - Insert the current time
Ctrl +; - Insert the current date
Ctrl + "- Copy the value of the cell above
Ctrl + '- Copy the formula from the cell above
Shift - Offset Adjustment for Additional Functions in the Excel Menu
Shift + F1 - What is it?
Shift + F2 - Edit cell comment
Shift + F3 - Paste the function into the formula
Shift + F4 - Search Next
Shift + F5 - Find
Shift + F6 - Previous Panel
Shift + F8 - Add to the selection
Shift + F9 - Calculate the active worksheet
Shift + F10 - Popup menu display
Shift + F11 - New spreadsheet
Shift + F12 - Save
Ctrl + F3 - Set name
Ctrl + F4 - Close
Ctrl + F5 - XL, size of the restore window
Ctrl + F6 - Next Workbook Window
Shift + Ctrl + F6 - Previous Workbook Window
Ctrl + F7 - Move window
Ctrl + F8 - Resize Window
Ctrl + F9 - Minimize the workbook
Ctrl + F10 - Maximize or Restore Window
Ctrl + F11 - Inset 4.0 Macro sheet
Ctrl + F1 - Open File
Alt + F1 - Insert a graph
Alt + F2 - Save As
Alt + F4 - Output
Alt + F8 - Macro dialog
Alt + F11 - Visual Basic Editor
Ctrl + Shift + F3 - Create a name using the names of row and column labels
Ctrl + Shift + F6 - Previous Window
Ctrl + Shift + F12 - Printing
Alt + Shift + F1 - New spreadsheet
Alt + Shift + F2 - Save
Alt + = - AutoSum
Ctrl + `- Toggle value / display of the formula
Ctrl + Shift + A - Insert the argument names in the formula
Alt + down arrow - automatic view list
Alt + '- Format Style Dialog
Ctrl + Shift + ~ - General Format


EaseUS Data Recovery Wizard Full Crack Serial Keygen | 100% Working Method

How to Crack EaseUS Data Recovery Wizard:

  1. First Disable internet.
  2. Copy Config.dat To Installation Directory
  3. Alternatively, copy the offline.cmd script to the installation directory and run it with administrator privileges.
  4. This will automatically update the Config.dat file. 
  5. Block <installation dir>\DRWUI.exe in your firewall, to prevent your license from getting blacklisted.
Use Keygen to register the application.
  1. How To Use Keygen:
  2. Disable Antivirus
  3. Run Keygen
  4. Click Generate & Copy Key From Keygen
  5. Run EaseUS Data Recovery Wizard & Now Click On Register Full Version & Paste Key
  6. Now Copy Machine Code & Paste In Keygen
  7. Now Copy Activation Code & Paste In Program
  8. Done !

Link#2


Watch Video of All Steps:

How to Activate Windows 10

We can active Windows 10, 8, and 7 with this method. 

1. Copy the below code.

@echo off
title Activate Windows 7 / 8 / 8.1 / 10 for FREE!&cls&echo =====================================&echo #Copyright: MSGuides.com&echo =====================================&echo.&echo #Supported products:&echo - Windows 7 Professional&echo - Windows 7 Professional N&echo - Windows 7 Professional E&echo - Windows 7 Enterprise&echo - Windows 7 Enterprise N&echo - Windows 7 Enterprise E&echo - Windows 8 Core&echo - Windows 8 Core Single Language&echo - Windows 8 Professional&echo - Windows 8 Professional N&echo - Windows 8 Professional WMC&echo - Windows 8 Enterprise&echo - Windows 8 Enterprise N&echo - Windows 8.1 Core&echo - Windows 8.1 Core N&echo - Windows 8.1 Core Single Language&echo - Windows 8.1 Professional&echo - Windows 8.1 Professional N&echo - Windows 8.1 Professional WMC&echo - Windows 8.1 Enterprise&echo - Windows 8.1 Enterprise N&echo - Windows 10 Home&echo - Windows 10 Home N&echo - Windows 10 Home Single Language&echo - Windows 10 Home Country Specific&echo - Windows 10 Professional&echo - Windows 10 Professional N&echo - Windows 10 Education N&echo - Windows 10 Education N&echo - Windows 10 Enterprise&echo - Windows 10 Enterprise N&echo - Windows 10 Enterprise LTSB&echo - Windows 10 Enterprise LTSB N&echo.&echo.&echo ====================================&echo Activating your Windows... & cscript //nologo c:\windows\system32\slmgr.vbs /ipk FJ82H-XT6CR-J8D7P-XQJJ2-GPDD4 >nul&cscript //nologo c:\windows\system32\slmgr.vbs /ipk MRPKT-YTG23-K7D7T-X2JMM-QY7MG >nul&cscript //nologo c:\windows\system32\slmgr.vbs /ipk W82YF-2Q76Y-63HXB-FGJG9-GF7QX >nul&cscript //nologo c:\windows\system32\slmgr.vbs /ipk 33PXH-7Y6KF-2VJC9-XBBR8-HVTHH >nul&cscript //nologo c:\windows\system32\slmgr.vbs /ipk YDRBP-3D83W-TY26F-D46B2-XCKRJ >nul&cscript //nologo c:\windows\system32\slmgr.vbs /ipk C29WB-22CC8-VJ326-GHFJW-H9DH4 >nul&cscript //nologo c:\windows\system32\slmgr.vbs /ipk BN3D2-R7TKB-3YPBD-8DRP2-27GG4 >nul&cscript //nologo c:\windows\system32\slmgr.vbs /ipk 2WN2H-YGCQR-KFX6K-CD6TF-84YXQ >nul&cscript //nologo c:\windows\system32\slmgr.vbs /ipk NG4HW-VH26C-733KW-K6F98-J8CK4 >nul&cscript //nologo c:\windows\system32\slmgr.vbs /ipk XCVCF-2NXM9-723PB-MHCB7-2RYQQ >nul&cscript //nologo c:\windows\system32\slmgr.vbs /ipk GNBB8-YVD74-QJHX6-27H4K-8QHDG >nul&cscript //nologo c:\windows\system32\slmgr.vbs /ipk 32JNW-9KQ84-P47T8-D8GGY-CWCK7 >nul&cscript //nologo c:\windows\system32\slmgr.vbs /ipk JMNMF-RHW7P-DMY6X-RF3DR-X2BQT >nul&cscript //nologo c:\windows\system32\slmgr.vbs /ipk M9Q9P-WNJJT-6PXPY-DWX8H-6XWKK >nul&cscript //nologo c:\windows\system32\slmgr.vbs /ipk 7B9N3-D94CG-YTVHR-QBPX3-RJP64 >nul&cscript //nologo c:\windows\system32\slmgr.vbs /ipk BB6NG-PQ82V-VRDPW-8XVD2-V8P66 >nul&cscript //nologo c:\windows\system32\slmgr.vbs /ipk GCRJD-8NW9H-F2CDX-CCM8D-9D6T9 >nul&cscript //nologo c:\windows\system32\slmgr.vbs /ipk HMCNV-VVBFX-7HMBH-CTY9B-B4FXY >nul&cscript //nologo c:\windows\system32\slmgr.vbs /ipk 789NJ-TQK6T-6XTH8-J39CJ-J8D3P >nul&cscript //nologo c:\windows\system32\slmgr.vbs /ipk TX9XD-98N7V-6WMQ6-BX7FG-H8Q99 >nul&cscript //nologo c:\windows\system32\slmgr.vbs /ipk 3KHY7-WNT83-DGQKR-F7HPR-844BM >nul&cscript //nologo c:\windows\system32\slmgr.vbs /ipk 7HNRX-D7KGG-3K4RQ-4WPJ4-YTDFH >nul&cscript //nologo c:\windows\system32\slmgr.vbs /ipk PVMJN-6DFY6-9CCP6-7BKTT-D3WVR >nul&cscript //nologo c:\windows\system32\slmgr.vbs /ipk W269N-WFGWX-YVC9B-4J6C9-T83GX >nul&cscript //nologo c:\windows\system32\slmgr.vbs /ipk MH37W-N47XK-V7XM9-C7227-GCQG9 >nul
echo ------------------------------------&echo.&echo.&set i=1
:server
if %i%==1 set KMS_Sev=kms7.MSGuides.com
if %i%==2 set KMS_Sev=kms8.MSGuides.com
if %i%==3 set KMS_Sev=kms9.MSGuides.com
if %i%==4 goto notsupported
cscript //nologo c:\windows\system32\slmgr.vbs /skms %KMS_Sev% >nul
cscript //nologo c:\windows\system32\slmgr.vbs /ato | find /i "successfully" && (echo.& echo ====================================== & echo. & choice /n /c YN /m "Would you like to visit my blog [Y,N]?" & if errorlevel 2 exit) || (echo The connection to the server failed! Trying to connect to another one... & echo Please wait... & echo. & echo. & set /a i+=1 & goto server)
explorer "http://MSGuides.com"&goto halt
:notsupported
echo ======================================&echo.&echo Sorry! Your version is not supported.
:halt
pause >nul
Or Download From Link.

2. Create new Notepad file(Text Document).


3. Past code on this Document and Save this file with the extension of .cmd (ex. windows.cmd).


4. Run file as Administrator.


5. Wait for the process if program show error then don't worry and wait.

6. Restart Computer/Laptop after complete the process.


How To Fix/Repair Corrupted USB or SD Card

Your USB and SD card Before the Process


Step 1:

Click on Windows button and search cmd on search bar. Click Right button of mouse and click on Run as administrator.


Step 2:

Write diskpart and press Enter.


Step 3:

Write list disk and press Enter.


Step 4:

Select disk who you want to format so write select disk 2 . (2 is the number of disk. You write your disk number carefully) and press Enter.


Step 5:

Write clean and press Enter.


Step 6:

Write creat partition primary and press Enter.


Step 7:

Write format fs=fat32 and press Enter. Then the formatting is start so wait for complete the process 100%.


Step 8:

After complete 100%. Write exit and press Enter

Your USB and SD card After the Process


Thanks for Read. 

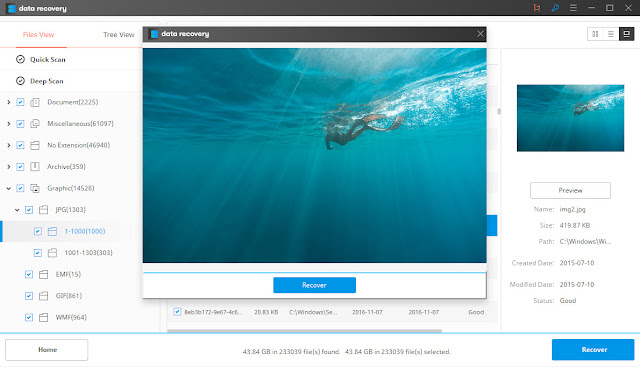
How to Recover Deleted Files From Hard Drive With Simple Steps

Step 1. 

Download Wondershare Data Rcovery on your computer or laptop and launch it

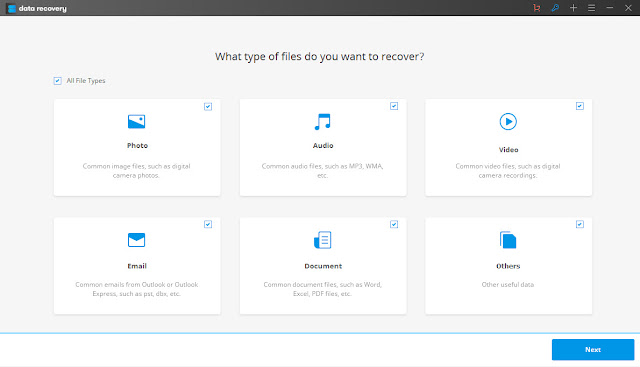
Step 2. 

Select the type of files you want to recover and begin to scan for deleted folders.


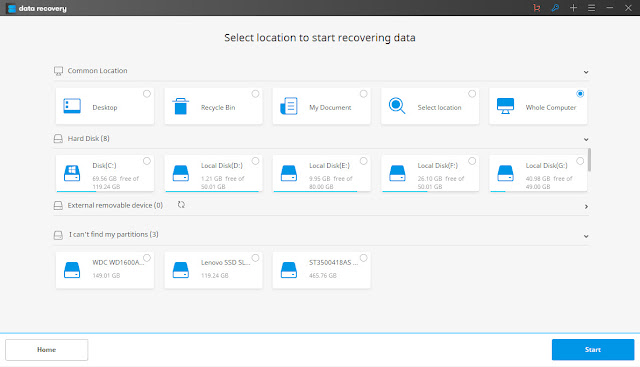
Step 3. 

Select the location where you lost your folders or files from, click "Start" to get your lost files.


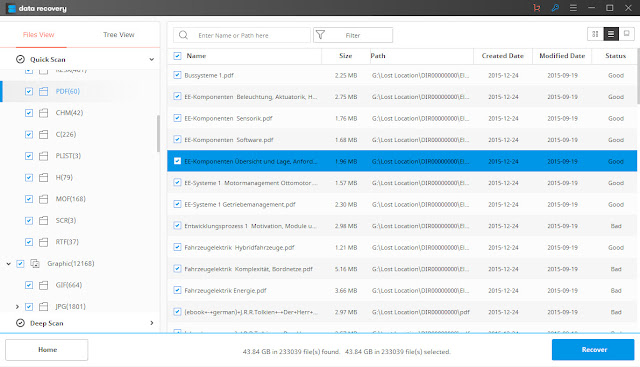
Step 4. 

After the scan, preview and check the recoverable files and get your lost folders back.


Step 5. 

With the option of Deep Scan, it will find more files by deeply searching. While it will take more time.


The one thing you need to remember is: Don't save the recovered files to the space where you lost your files previously, this could interrupt the process and permanently delete the data.


Computer is a basic think in the life of every person. During use of computer or laptop he shows different behavior as compare to usual. He work very slowly and stop during the work. Because the dump files create on hard disk C. Dump files create due to virus and other corrupt files.